Saturday, July 11, 2009
Ibuki's on hold, for the moment
So I lucked out and have finally managed to make my way into the world of the gainfully employed, at a game studio no less (woo!). Sadly that means I have to put this project on hold until I can get Maya up and running at home but first, as part of Operation Continued Employment, I need to start learning my way around 3D Studio Max.
Friday, June 19, 2009
3 steps back, 1 step forward
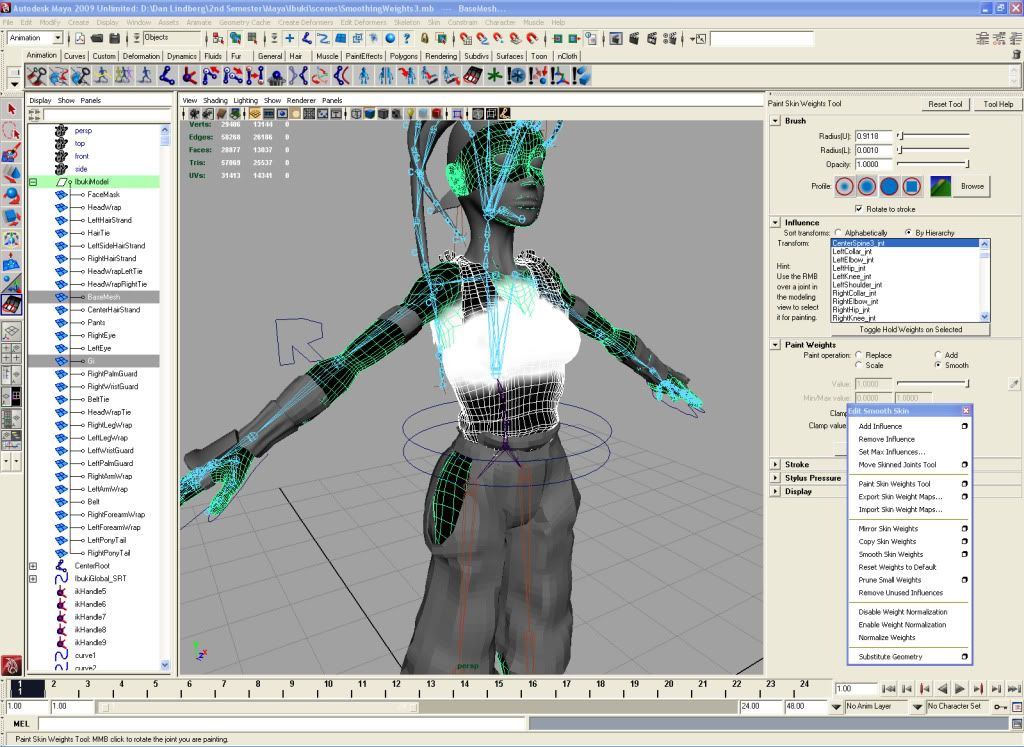
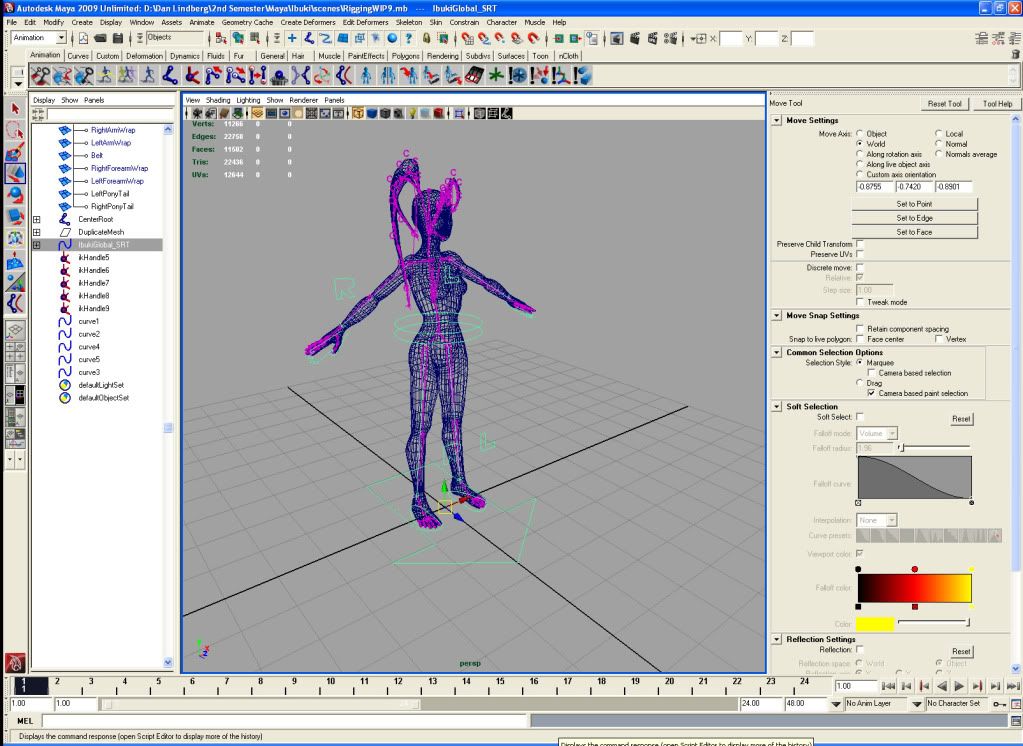
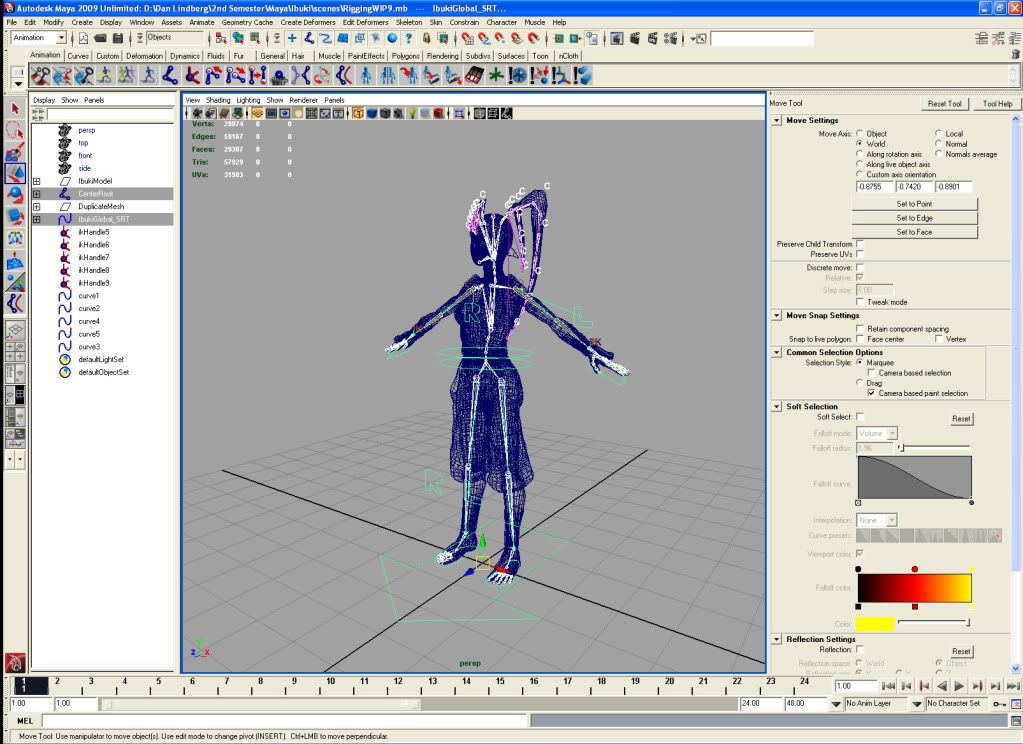
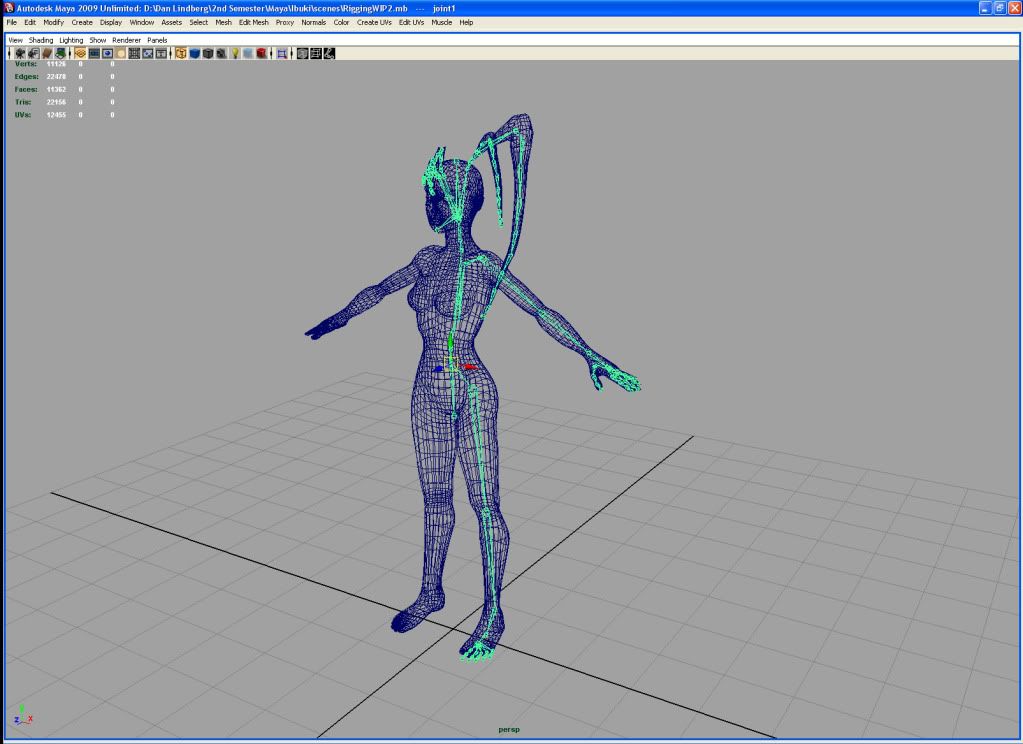
I don't know if I'm stubborn or stupid, probably a bit of both, but I've decided not only to get rid of my old weight map but my rig and constraints as well. The old weight map was simply too far gone and the old rig and constraints were simply too limited. I also took the opportunity to improve the edge flow of certain areas of my base mesh, add edge loops in others to help improve how the character deforms as well as some quick modeling touch ups. The new rig, as pictured below, has more Joints that will require more work with the weight painting but in the end it will deform better. Hopefully.
A thoughtful friend emailed me a link where I could download some mel scripts for custom skinning tools, thanks Brendan. I was able to addthe script and play around with it a bit today, the mel appears to combine the component editor and weight painting tools in one easy to access menu. We'll see how the weight painting goes tomorrow. When I skin I'll make sure to remove the unnecessary influences--like Ankle Joints from the Pants geo--and hold bones when painting values and smoothing. If there are any anomalies, which I suspect there will be when I smooth, I'll just have to delve into the component editor and manually remove the aberrant values.
I'm not certain if this is the best hierarchy I could have come up with, I couldn't figure out exactly how I wanted the shoulder blades and collar bones connected. I ended up going with having the collar bones seperate from the shoulder blades and arms, we'll see if I come to regret that later. Given that this will probably just be posed I'm not too worried about the hierarchy, it would probably suck to animate though.
Also I took this opportunity to add in the secondary action you were asking for Singh.


I did have even more joints in the thigh, calf, and rib cage but I figured that was going a bit overkill and probably into territory where the muscle system should be used to maintain volumes. Once I have some more experience with rigging I might try some more complicated rigs involving even more Joints to maintain volumes and deform better.
The process should go by quicker given that it's not exactly my first time doing it now. I was able to do my quick fixes and recreate the rig in about half the time it took me on my first attempt. Today was a much better day than the last few.
A thoughtful friend emailed me a link where I could download some mel scripts for custom skinning tools, thanks Brendan. I was able to addthe script and play around with it a bit today, the mel appears to combine the component editor and weight painting tools in one easy to access menu. We'll see how the weight painting goes tomorrow. When I skin I'll make sure to remove the unnecessary influences--like Ankle Joints from the Pants geo--and hold bones when painting values and smoothing. If there are any anomalies, which I suspect there will be when I smooth, I'll just have to delve into the component editor and manually remove the aberrant values.
I'm not certain if this is the best hierarchy I could have come up with, I couldn't figure out exactly how I wanted the shoulder blades and collar bones connected. I ended up going with having the collar bones seperate from the shoulder blades and arms, we'll see if I come to regret that later. Given that this will probably just be posed I'm not too worried about the hierarchy, it would probably suck to animate though.
Also I took this opportunity to add in the secondary action you were asking for Singh.
I did have even more joints in the thigh, calf, and rib cage but I figured that was going a bit overkill and probably into territory where the muscle system should be used to maintain volumes. Once I have some more experience with rigging I might try some more complicated rigs involving even more Joints to maintain volumes and deform better.
The process should go by quicker given that it's not exactly my first time doing it now. I was able to do my quick fixes and recreate the rig in about half the time it took me on my first attempt. Today was a much better day than the last few.
Wednesday, June 17, 2009
Ibuki WIP, update 8
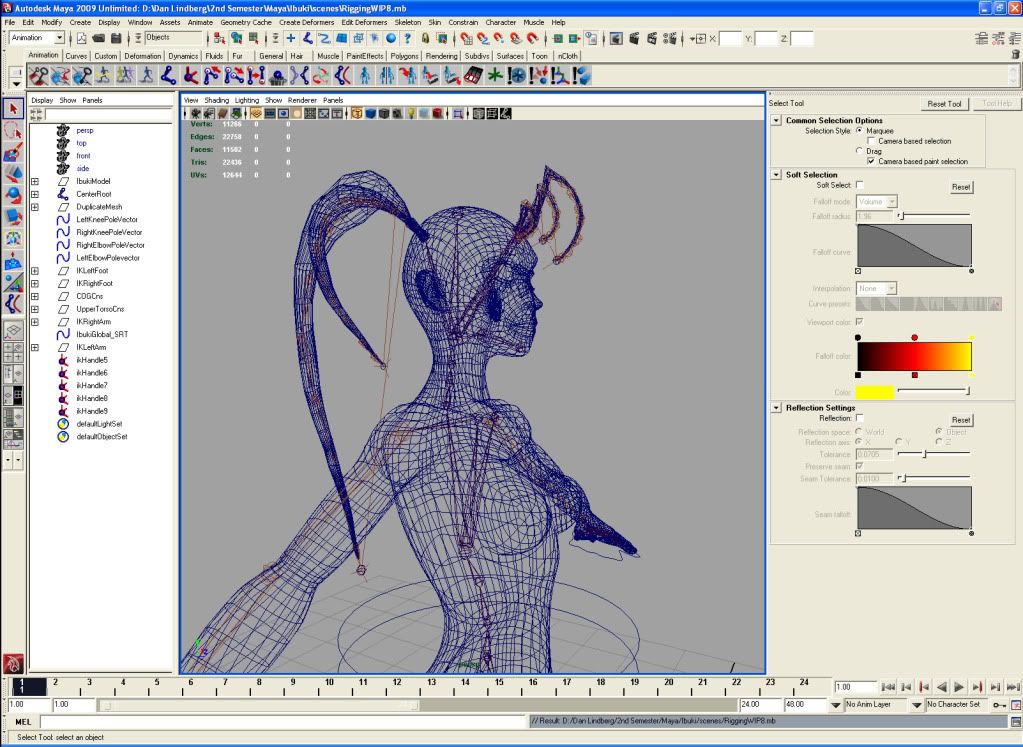
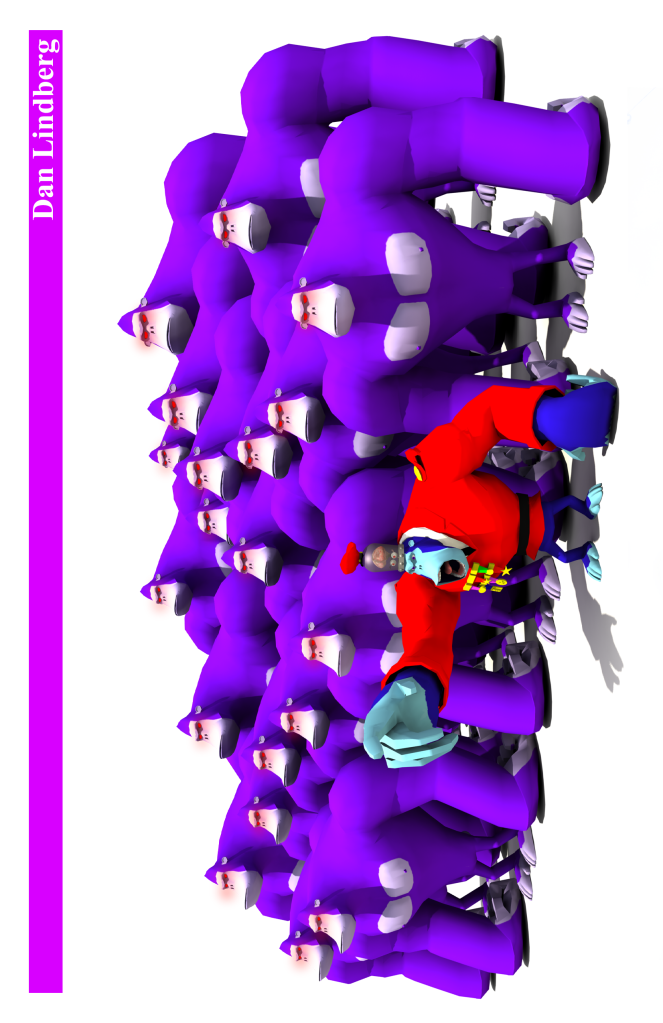
I am frustrated beyond belief with Maya's weighting tools, my understanding of them is clearly lacking and I simply cannot get the kind of deformation that I want with this character. I keep getting these anomalous values and I don't know how to make Maya stop doing that. I need to watch some more tutorials and figure this out since it's supposed to be a part of my new demo reel.
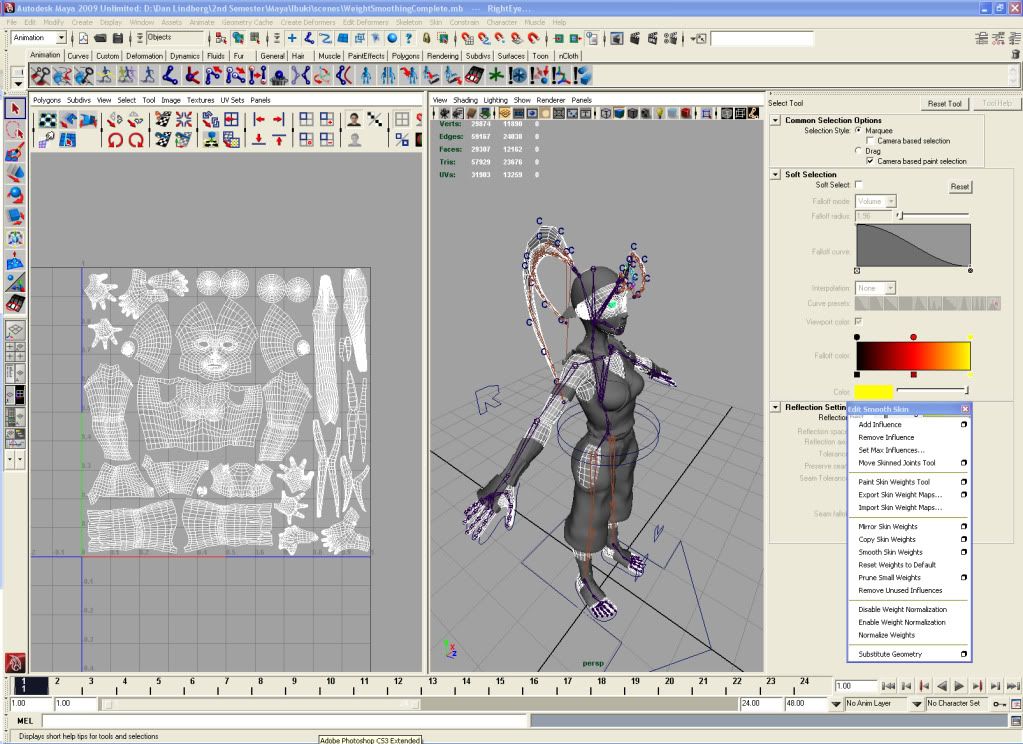
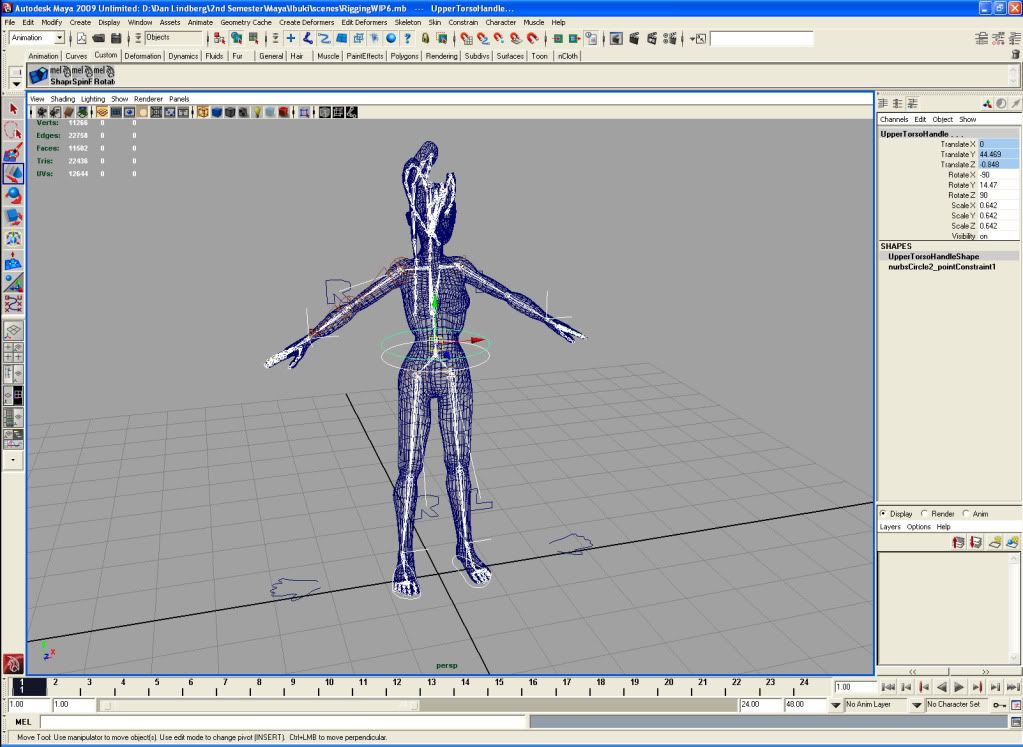
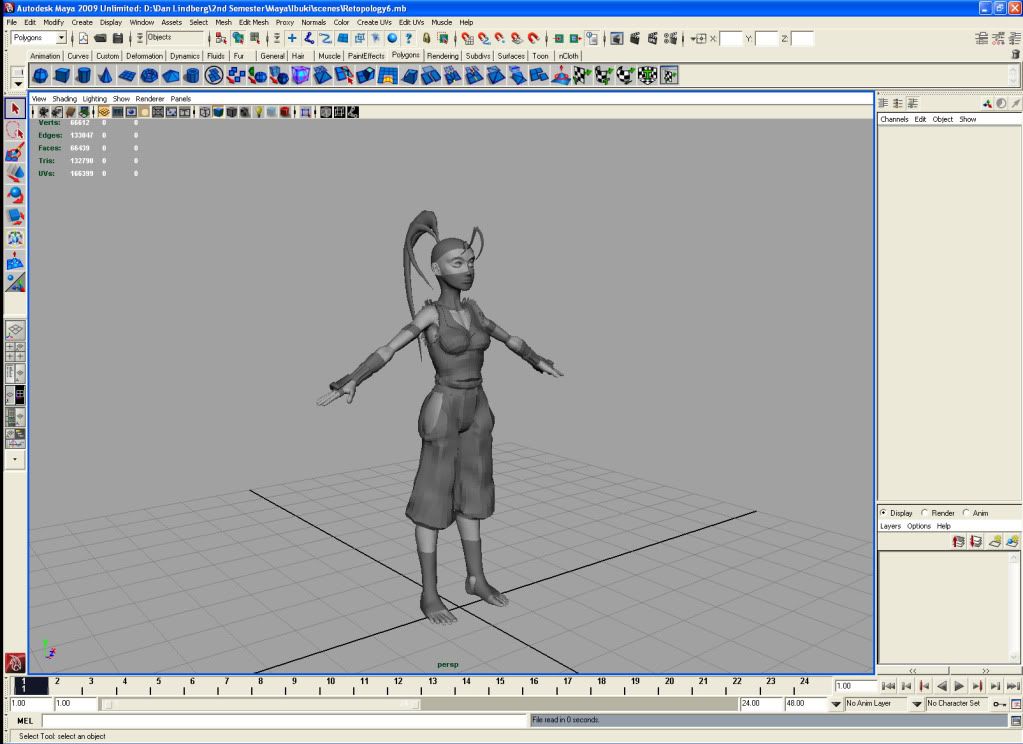
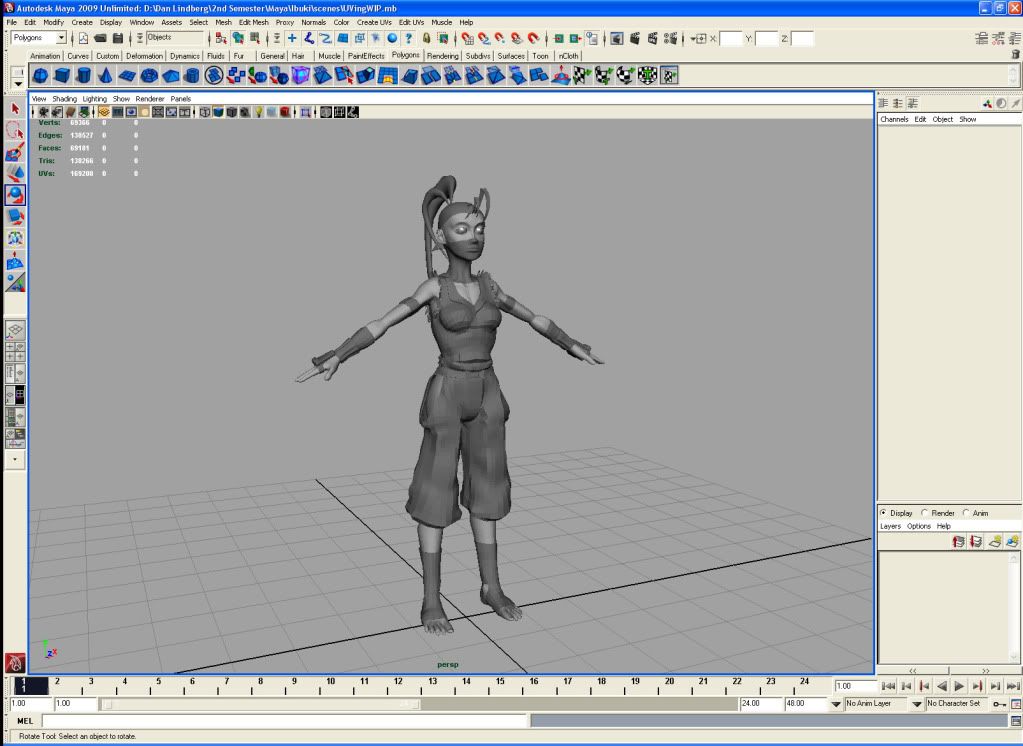
Here's the rough pose I'm going to end up rendering the character off in. At this juncture I'm unsure if I want to attempt to do some basic animations with this character, the rig is really basic. I also want to get on to simply doing some animation, no more modeling or rigging or dealing with issues that arise because of either.

Here's the rough pose I'm going to end up rendering the character off in. At this juncture I'm unsure if I want to attempt to do some basic animations with this character, the rig is really basic. I also want to get on to simply doing some animation, no more modeling or rigging or dealing with issues that arise because of either.
Tuesday, June 16, 2009
Today I learned an important lesson
And that's the difference between Delete All By Type > History and Delete All By Type > Non-Deformer History and what it means to and does to your rig. One option deletes your modeling history, the other sodomizes your rig. Normally I'm pretty good about iterating saves and testing out major changes but yesterday that wasn't the case. I pushed the sodomize rig button, didn't test out any of the changes, saved, closed the program and today I discovered I lost about half a days work when I showed a friend what I was working on.
Well, I'll never make that mistake again.
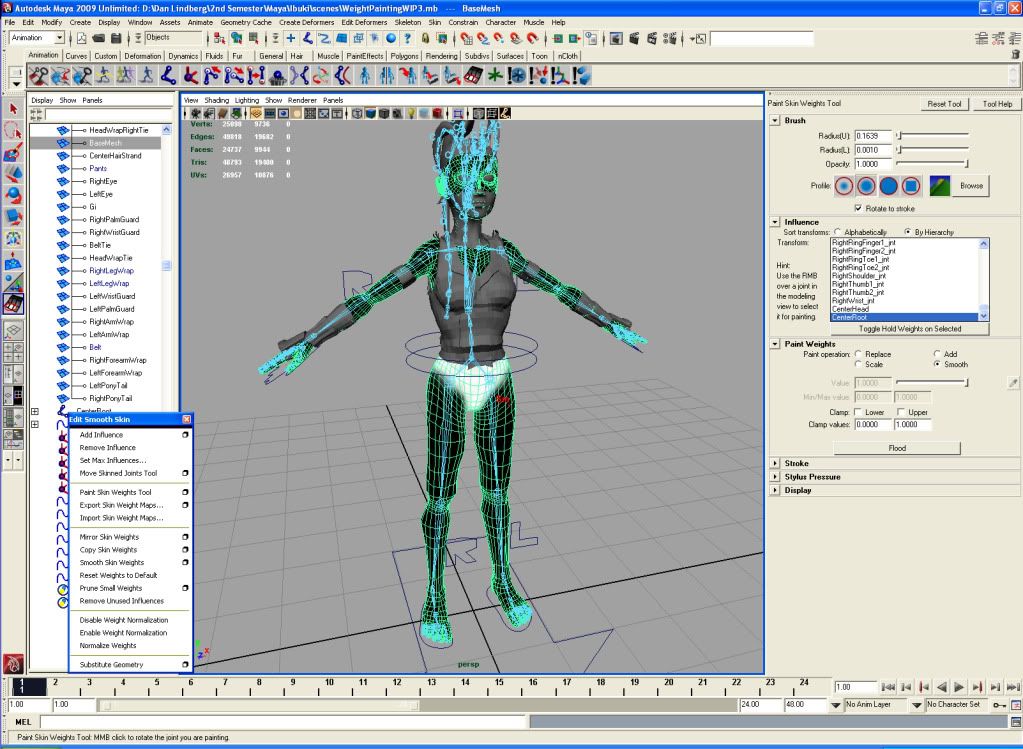
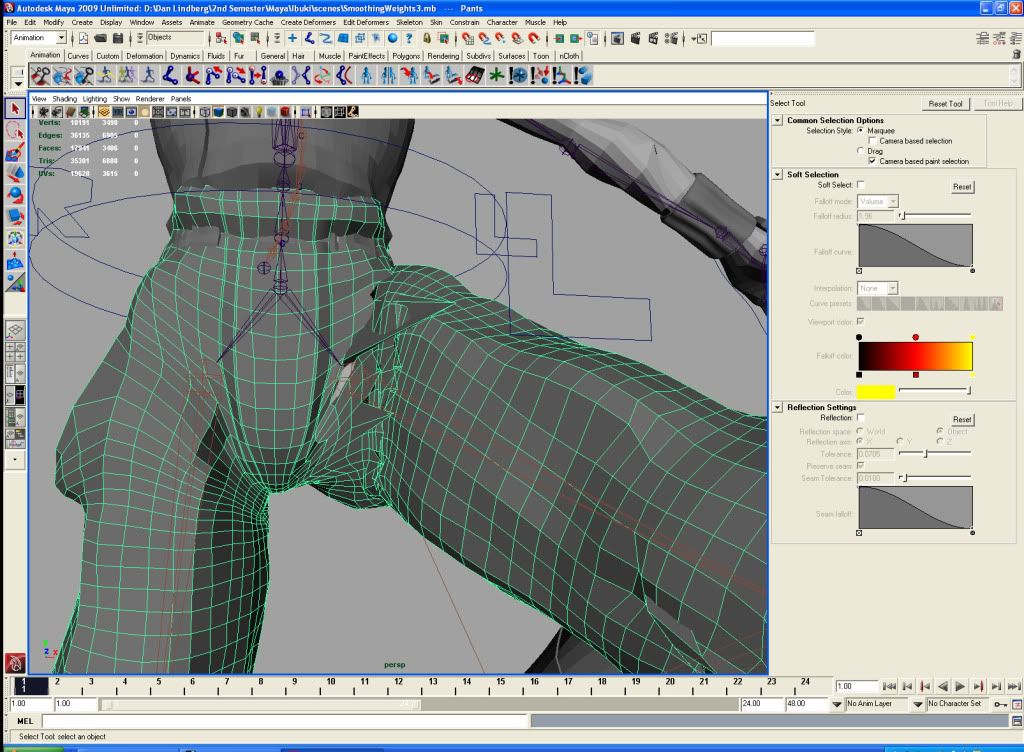
Also I'd like to add that the Smooth Brush in the Paint Skin Weights Tool is a terrible, terrible tool. Even if I remove Joints influence from a particular piece of geometry, like how the ankle Joints have no business influencing the pants, or if I lock/hold the Joints in the Paint Skin Weight Tool option the Smooth Brush STILL adds value anomalies and gives me this ridiculous deformations that simply should not be happening. The Smooth Brush doesn't logically spread the value between the only two unlocked/unheld Joints that should be influencing the geometry it gives value to random joints in the hierarchy. I've spent so much time trying to make Smooth Brush not suck, I could have spent the same time just manually painting in the values with the Replace Brush, which is what I'm going to do now. I'll manually paint in the values on one side and mirror everything.
Well, I'll never make that mistake again.
Also I'd like to add that the Smooth Brush in the Paint Skin Weights Tool is a terrible, terrible tool. Even if I remove Joints influence from a particular piece of geometry, like how the ankle Joints have no business influencing the pants, or if I lock/hold the Joints in the Paint Skin Weight Tool option the Smooth Brush STILL adds value anomalies and gives me this ridiculous deformations that simply should not be happening. The Smooth Brush doesn't logically spread the value between the only two unlocked/unheld Joints that should be influencing the geometry it gives value to random joints in the hierarchy. I've spent so much time trying to make Smooth Brush not suck, I could have spent the same time just manually painting in the values with the Replace Brush, which is what I'm going to do now. I'll manually paint in the values on one side and mirror everything.
Monday, June 15, 2009
Ibuki WIP, update 7 - Weight Painting Fun Times!
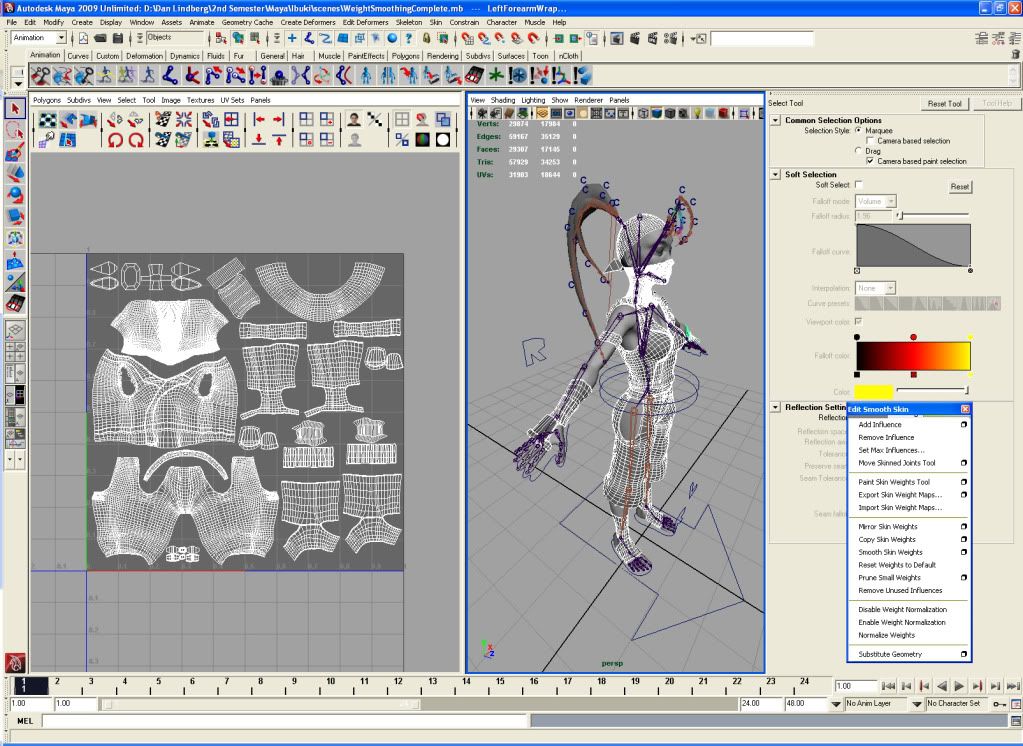
Weight painting has been a bit of an exercise in frustration, partially because I'm learning how to do it in a new program and I always seem to struggle with achieve the level of deformation that I want but I've also been encountering this weird issue with the smoothing brush. Every time I try to smooth the values between two joints I get this anomaly where a small percentage of deformation value is assigned to what seems to be a really random joint far, far down in the hierarchy. Like the ball of the foot joint will somehow control some small percentage of the values of a bit of geometry that should be entirely controlled by the C.O.G. or hip joint. It's been kind of maddening trying to fix all of these little weird niggling issues.
The weight painting is done, for now, I'm fairly certain that once I start to animate or pose the character I'll encounter some hideous issues. That always seems to happen. At least I can finally move on to texturing and normal mapping. I may have to come up with some basic eye constraints, or I could just get by with simply rotating her eyes when I pose her.
I can see the light is at the end of the tunnel.
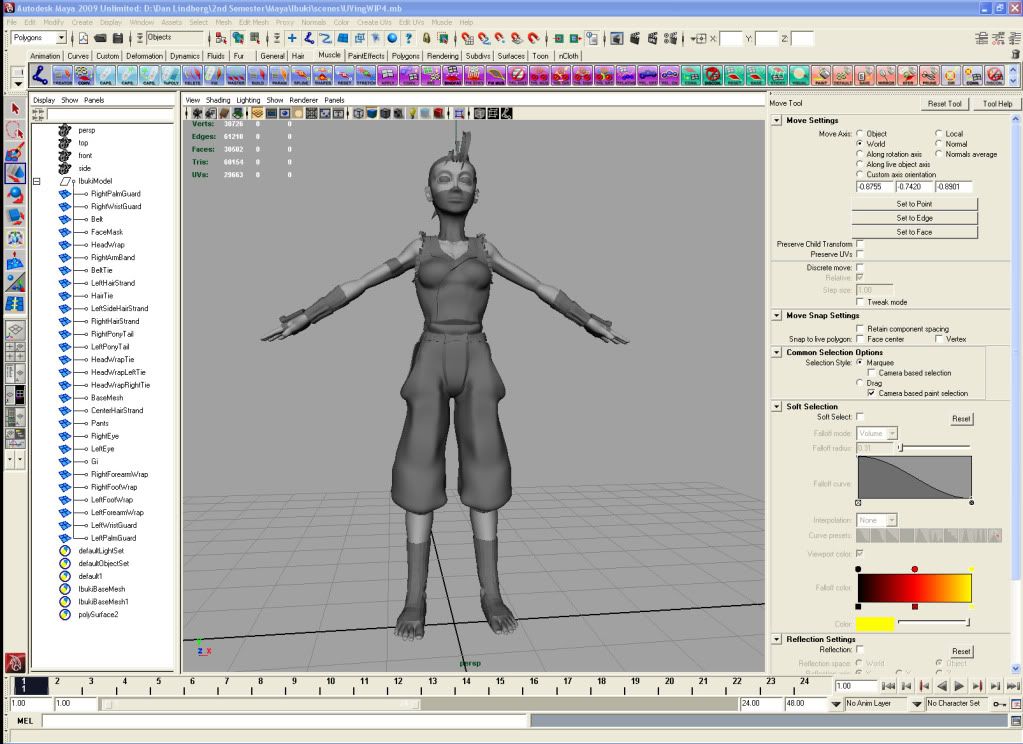
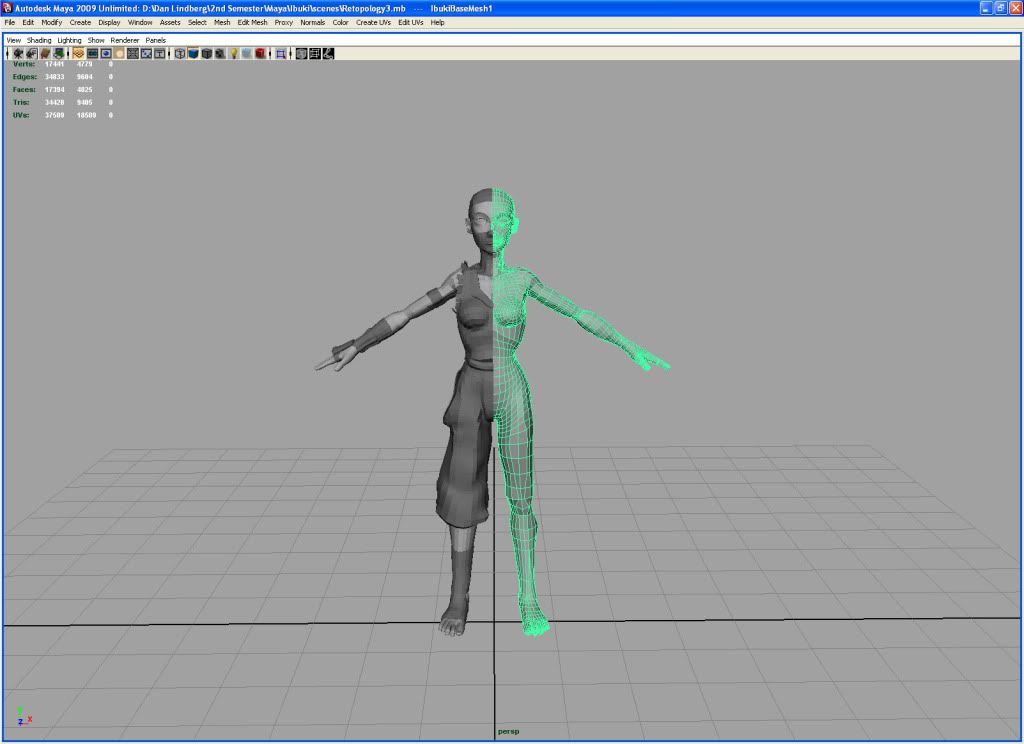
Here are my (likely less than impressive) UV's. I have no aspirations to be a texture artist so my UV maps probably aren't organized as effeciently as they could be, there's probably some space I could maximiaze a bit better, but whatever. There's no overlapping UV's, which I understand would be my largest cause for concern when normal mapping.
The weight painting is done, for now, I'm fairly certain that once I start to animate or pose the character I'll encounter some hideous issues. That always seems to happen. At least I can finally move on to texturing and normal mapping. I may have to come up with some basic eye constraints, or I could just get by with simply rotating her eyes when I pose her.
I can see the light is at the end of the tunnel.
Here are my (likely less than impressive) UV's. I have no aspirations to be a texture artist so my UV maps probably aren't organized as effeciently as they could be, there's probably some space I could maximiaze a bit better, but whatever. There's no overlapping UV's, which I understand would be my largest cause for concern when normal mapping.
Wednesday, June 3, 2009

Tuesday, June 2, 2009
Ibuki WIP, update 5
I've begun learning how to rig in Maya. maya's joint system seems to be a bit more flexible than XSI's bones while setting up constraints in Maya is...different. I have fixed the orientation of all my joints, making sure their axis' are facing the correct way so things do go snakey with additive rotation. I've got the IK set up on both the legs and arms, the feet/leg IK have successfully been constrained, everything's been appropriately named and labeled so the initial weighting will work out well, the COG and upper torso have both been constrained to allow for independent upper body movement. All I have left are the hands IK constraints and some curve constraints for the ponytails. Then weight painting fun times can begin.

Friday, May 29, 2009
Ibuki WIP, update 4
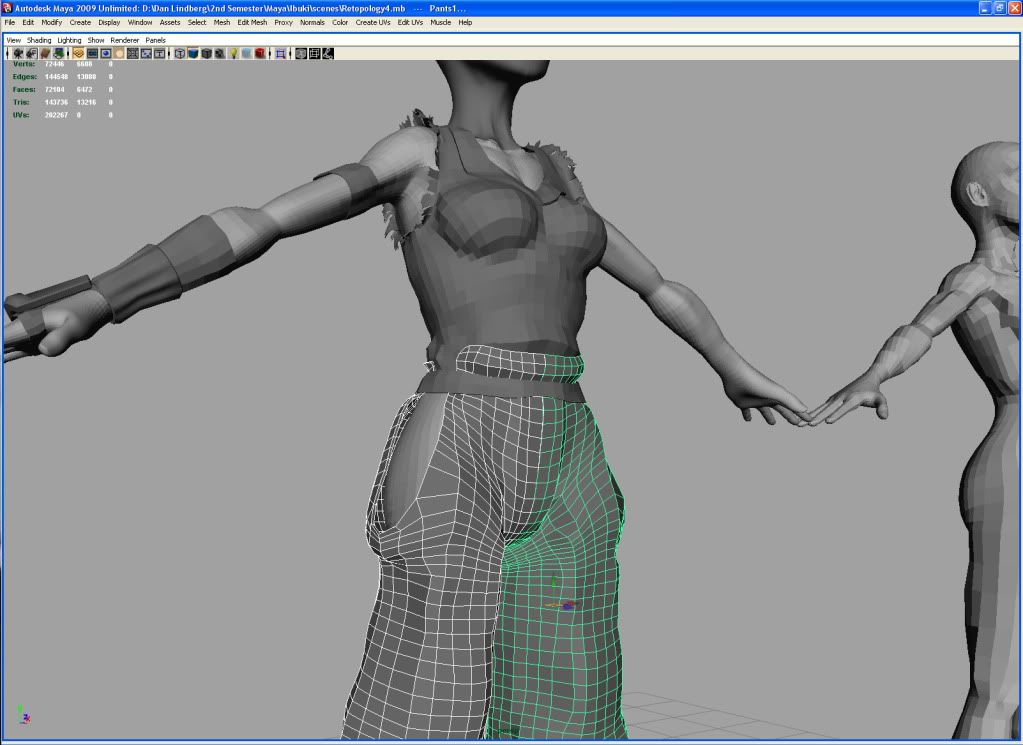
I ended up nuking a lot of the detail I had modeled in the previous week. I deleted all of the volumes the clothing had, basically converting almost every article of clothing to a poly plane because it was simply a nightmare to UV unwrap everything, especially the torn Gi sleeves. I could have left the UV's a mess, gone with little to no detail, relying largely on shaders, lighting and AO to fill in the blanks or used automatic UV's in zbrush but the point of this exercise is to learn other programs and techniques, like normal mapping, that I currently don't know. I also deleted the base mesh and reworked an older iteration because there was too much unneeded complexity, RoadKill was eating up over 50% of my computers physical memory, selecting a single edge had a delay of a few seconds, it was just unworkable.

The good news is it only took me two days to fix everything and make it as painless and simple as possible to UV everything.

I don't know how I would UV anything if it wasn't for RoadKill.
Now I can finally apply what I've been learning about rigging and skinning in Maya. By Wednesday I should have Ibuki fully rigged and skinned leaving just the texturing and normal mapping. The project's going a little slower than I would like but 3d always seems to take more time than you initially imagine.
The good news is it only took me two days to fix everything and make it as painless and simple as possible to UV everything.
I don't know how I would UV anything if it wasn't for RoadKill.
Now I can finally apply what I've been learning about rigging and skinning in Maya. By Wednesday I should have Ibuki fully rigged and skinned leaving just the texturing and normal mapping. The project's going a little slower than I would like but 3d always seems to take more time than you initially imagine.
Monday, May 25, 2009
Ibuki WIP, update 3
Edge flow was fixed, volume was added to most of the clothing, muscle system was used to shrink wrap various bits of the clothing better to the model, the ripped sleeves, hair strands, belt and head wrap ties were modeled and instances have been merged. Now I'm ready to UV and start to learn maya's rigging system.

I ganked XSI man's eyes and discovered I just have to do some quick resphaping with the head. The sockets aren't quite the right shape.
I ganked XSI man's eyes and discovered I just have to do some quick resphaping with the head. The sockets aren't quite the right shape.
Tuesday, May 19, 2009
Ibuki WIP update 2
I've taken the base mesh of the character and the clothing out of zbrush back into, added volume to most of the clothing, fixed some of the edge flow and started making the details in maya that I couldn't in zbrush (the gloves and torn gi sleeves).
I re-exported the base mesh back into zbrush, increased the geometry by one subdivision and brought it back to maya and then used maya's muscle system to shrink wrap some of the clothing on to the base mesh.

I imagine that I'll have one more day of modeling details (hair and a few more bits of clothing) and merging the instances together and then I can move on to UV'ing and rigging. I'd probably be further along with this if I wasn't having to split up my time between school and looking for a new place to live. This project is going a little slower than I would like. But it's necessary to learn the ins and outs of the hyper shader and rigging in maya.
I re-exported the base mesh back into zbrush, increased the geometry by one subdivision and brought it back to maya and then used maya's muscle system to shrink wrap some of the clothing on to the base mesh.
I imagine that I'll have one more day of modeling details (hair and a few more bits of clothing) and merging the instances together and then I can move on to UV'ing and rigging. I'd probably be further along with this if I wasn't having to split up my time between school and looking for a new place to live. This project is going a little slower than I would like. But it's necessary to learn the ins and outs of the hyper shader and rigging in maya.
Tuesday, May 12, 2009
Ibuki WIP, update 1
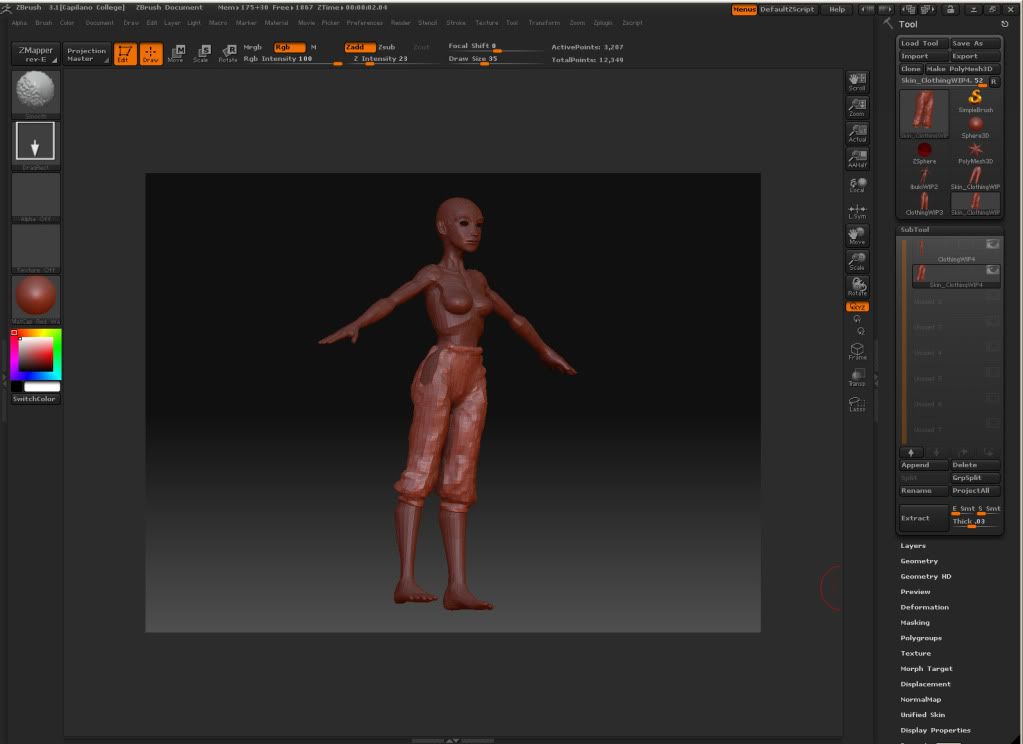
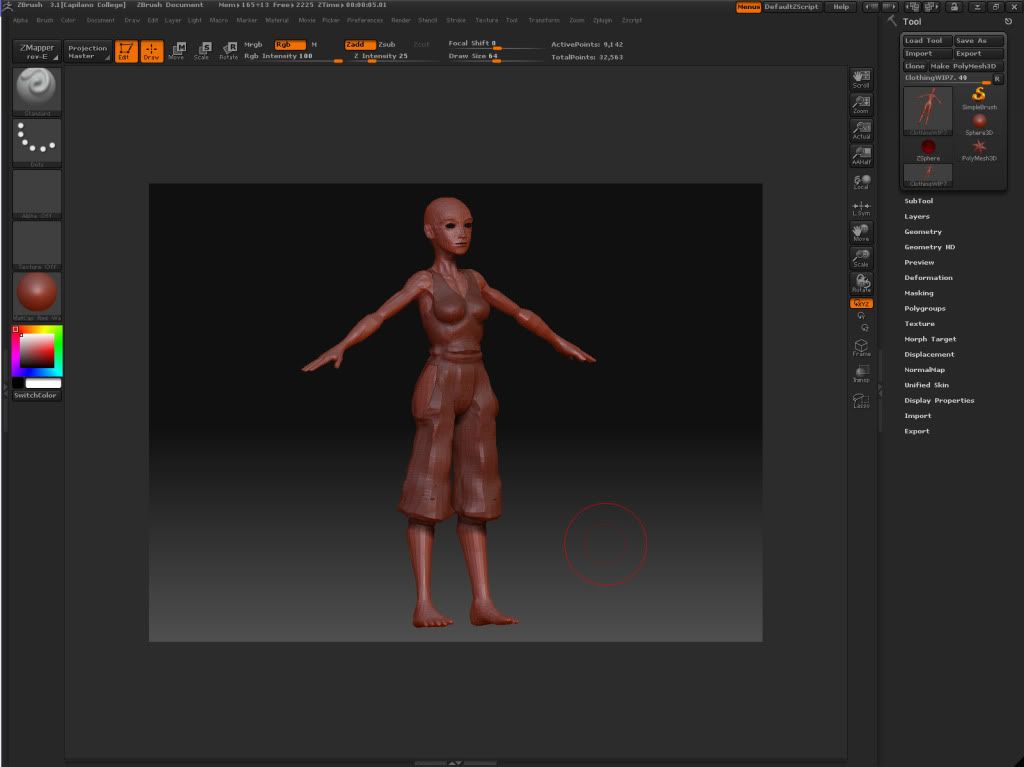
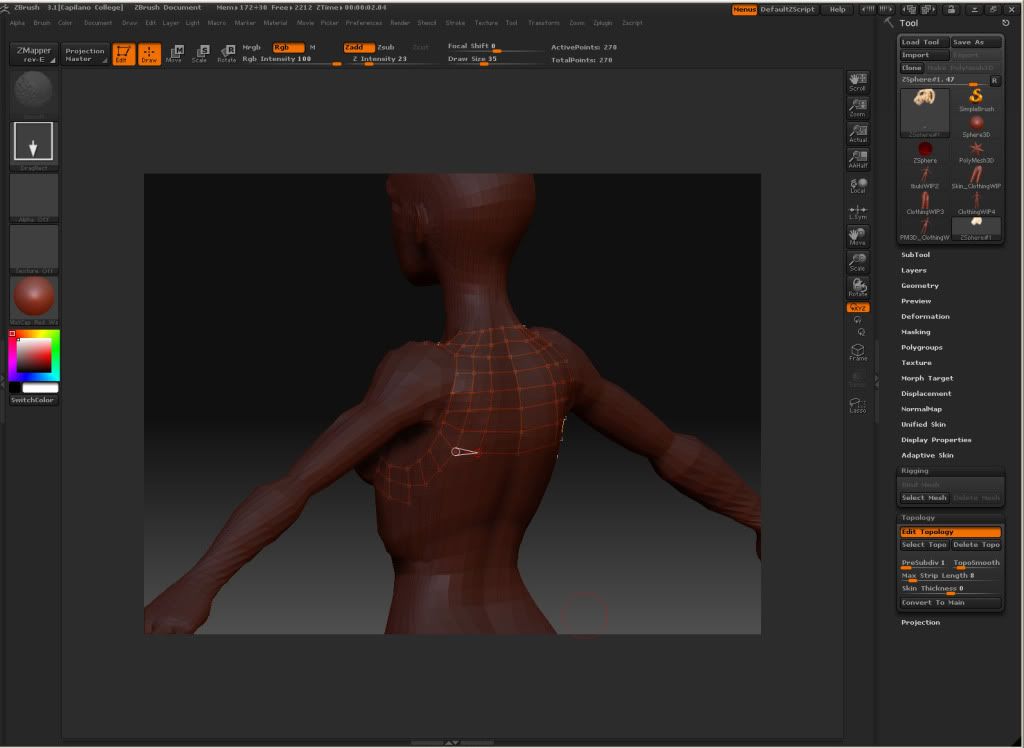
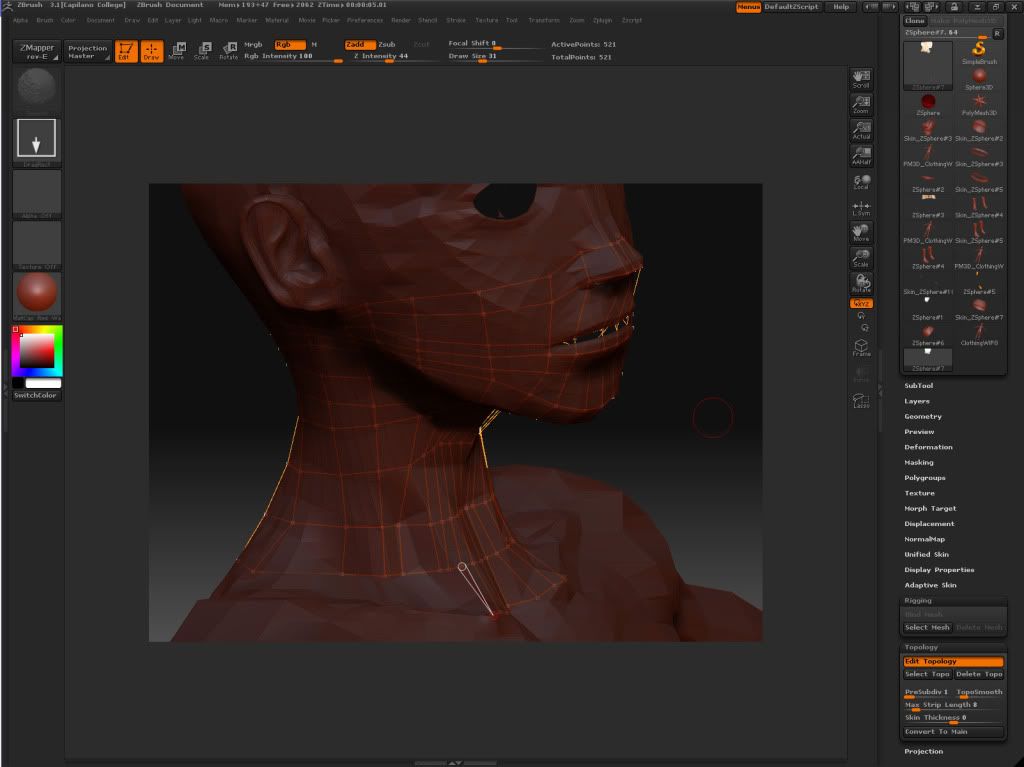
I've been mucking about with Zbrush for the last two days, I have become more accustomed to the interface and more familiar with the various brushes. It's such a powerful tool. I was able to make the clothing pretty painlessly through re-topology. once I finish off the arm bands I'll have the base meshes done. Then I can import all of the items as objs into Maya, clean up the topology a bit, make a few detail items (ripped sleeves, hair, etc.) and UV everything so I can normal map the character. If I decide to go that route.

Friday, May 8, 2009
Ibuki, a work in progress
While searching for a job I've come up with a make work project to help teach myself more of Maya (specifically rigging and using the hyper shader), to have better understanding of Zbrush and normal mapping as well as having something worth posting on CGTalk.
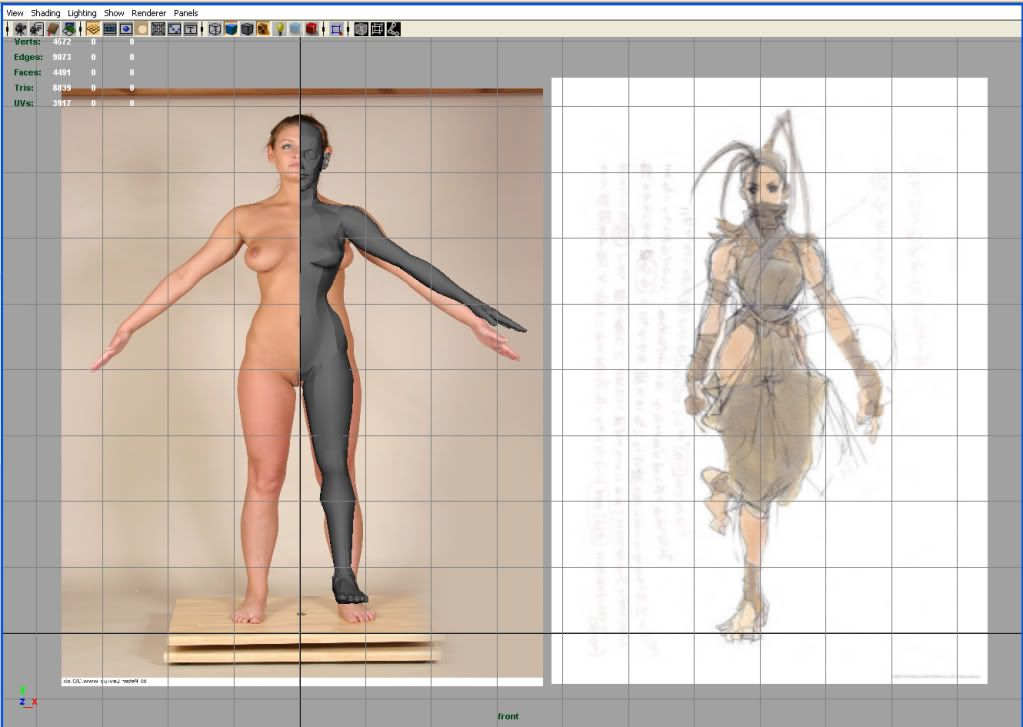
A classmate of mine made a pretty kick ass Chun-Li and that inspired myself and a some of my classmates to try our hand at making our own Street Fighter characters. I've chosen Ibuki, the ninja girl from Street Fighter 3.
Since I'm not too comfortable using ZSpheres I started modeling the base mesh for the characcter in Maya 2009. This is the seventh thing, I believe, that I've modeled thus far and the first attempt at modeling a woman. I used this tutorial as a jumping off point because it showed a fair bit of process.
I kind of skirted the line between the reference and the artwork.

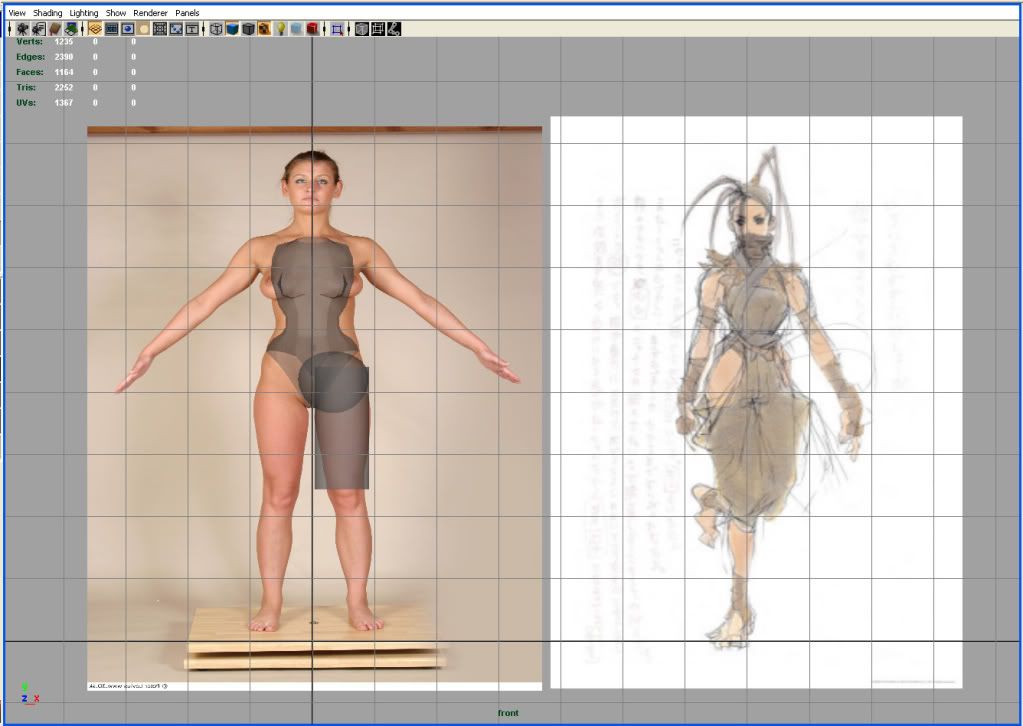

The torso was based off of a cylinder as were the arms and the legs. Since I'm not too worried about the topology I just boolean'd the cylinders together with spheres to get the shape of the shoulders and the butt and cleaned up the mess as I went along. I didn't want to spend too much time manipulating vertices and what not since I was going to fix it in Zbrush.
I ganked the hands, feet and ears off of xsi man, the head started off as the simple woman's head you can generate from primitive>characters in xsi took them into Maya as obj's and frankenstien'd everything together. The hands, feet and ears are largely the same but the head had to be modified quite a bit. this is what I ended up with this.
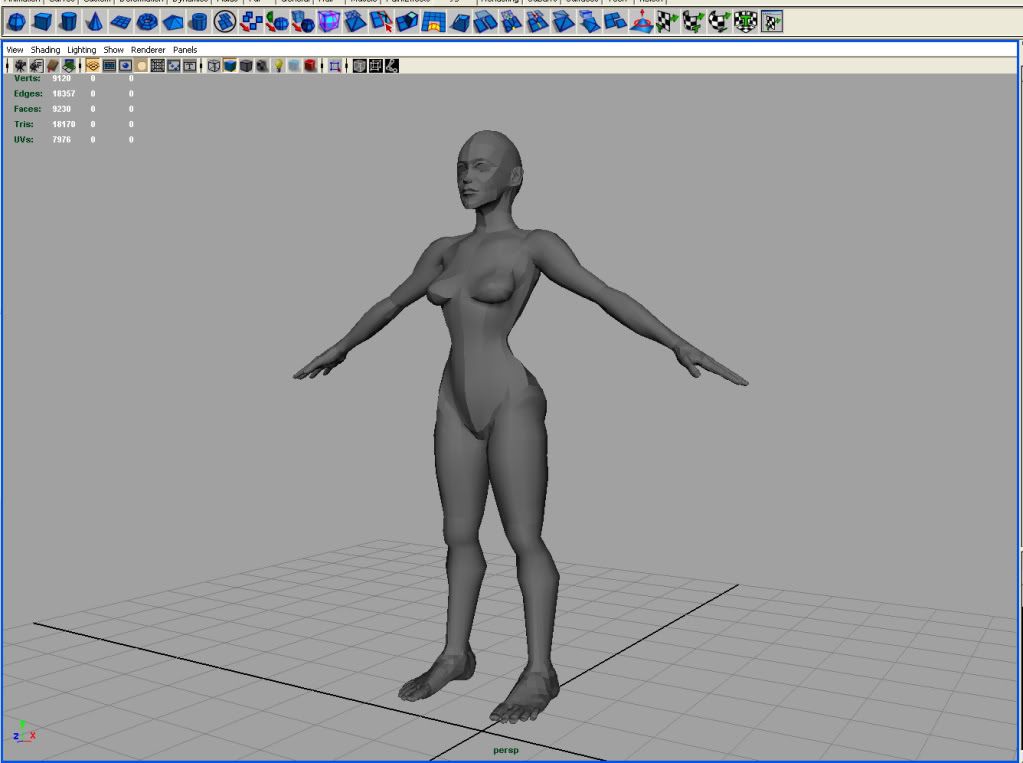
I dubbed the base mesh He-Ra Princess of Power. The shoulders were way too large, the neck was too thick from the front view and the head was too long and tall, but that's what Zbrush is for.
After working on the character in Zbrush for a while I ended up having to export my base mesh back into Maya from Zbrush to clean up some of the geo and fix some of the vertices. They weren't quite center and the symmetrical sculpting in Zbrush was getting thrown off. Here's what I have to take back into ZBrush.
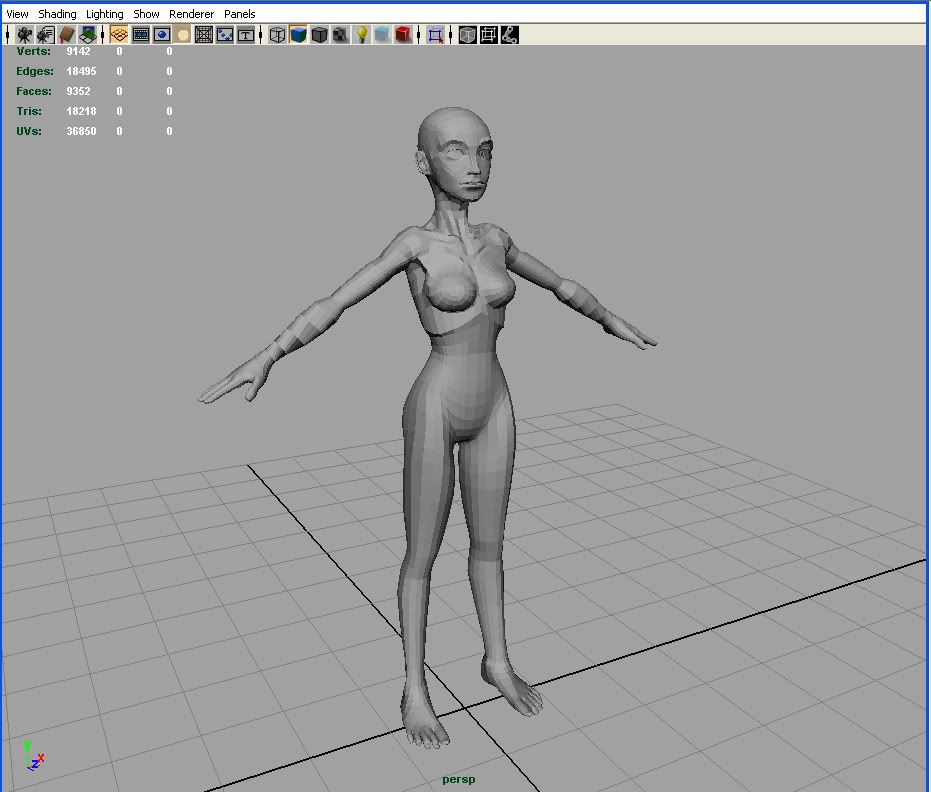
Definitely looking a bit more feminine and stylised but the neck looks a little too long, as does the lower half of her body. Nothing I can't fix in ZBrush. Once I get the proportions and the shape exactly where I want them to be I'll take the base mesh back into Maya, fix whatever topology issues the mesh has, create the base mesh for her costume and UV everything so I can normal map it all. I think most of the normal mapping will be done on her clothing but her body will definitely need at least one higher level of subdivision to smooth it all out.
Overall I'm pretty happy with the project up to this point, I've finally started to wrap my head around ZBrush's interface and modeling with ZBrush is so much more fun, artistic even, than the ol' extrude, point/face/edge manipulation.
By the end of next week I hope to have Ibuki ready to be textured and rigged. Then I can move on to learning how to animate in Maya. I can start off with some simple animated poses with Ibuki and then segue into doing full on animation with some downloadable rigs. I want to have an entirely new portfolio and demo reel to take around to all of the studios I've just applied to.
Next week I hope to have a complete or nearly complete modeled/normal mapped character to post.
A classmate of mine made a pretty kick ass Chun-Li and that inspired myself and a some of my classmates to try our hand at making our own Street Fighter characters. I've chosen Ibuki, the ninja girl from Street Fighter 3.
Since I'm not too comfortable using ZSpheres I started modeling the base mesh for the characcter in Maya 2009. This is the seventh thing, I believe, that I've modeled thus far and the first attempt at modeling a woman. I used this tutorial as a jumping off point because it showed a fair bit of process.
I kind of skirted the line between the reference and the artwork.
The torso was based off of a cylinder as were the arms and the legs. Since I'm not too worried about the topology I just boolean'd the cylinders together with spheres to get the shape of the shoulders and the butt and cleaned up the mess as I went along. I didn't want to spend too much time manipulating vertices and what not since I was going to fix it in Zbrush.
I ganked the hands, feet and ears off of xsi man, the head started off as the simple woman's head you can generate from primitive>characters in xsi took them into Maya as obj's and frankenstien'd everything together. The hands, feet and ears are largely the same but the head had to be modified quite a bit. this is what I ended up with this.
I dubbed the base mesh He-Ra Princess of Power. The shoulders were way too large, the neck was too thick from the front view and the head was too long and tall, but that's what Zbrush is for.
After working on the character in Zbrush for a while I ended up having to export my base mesh back into Maya from Zbrush to clean up some of the geo and fix some of the vertices. They weren't quite center and the symmetrical sculpting in Zbrush was getting thrown off. Here's what I have to take back into ZBrush.
Definitely looking a bit more feminine and stylised but the neck looks a little too long, as does the lower half of her body. Nothing I can't fix in ZBrush. Once I get the proportions and the shape exactly where I want them to be I'll take the base mesh back into Maya, fix whatever topology issues the mesh has, create the base mesh for her costume and UV everything so I can normal map it all. I think most of the normal mapping will be done on her clothing but her body will definitely need at least one higher level of subdivision to smooth it all out.
Overall I'm pretty happy with the project up to this point, I've finally started to wrap my head around ZBrush's interface and modeling with ZBrush is so much more fun, artistic even, than the ol' extrude, point/face/edge manipulation.
By the end of next week I hope to have Ibuki ready to be textured and rigged. Then I can move on to learning how to animate in Maya. I can start off with some simple animated poses with Ibuki and then segue into doing full on animation with some downloadable rigs. I want to have an entirely new portfolio and demo reel to take around to all of the studios I've just applied to.
Next week I hope to have a complete or nearly complete modeled/normal mapped character to post.
Thursday, April 23, 2009


Friday, March 20, 2009
Cloney Island Animatic.
Here's the animatic for my Cloney Island demo reel short.
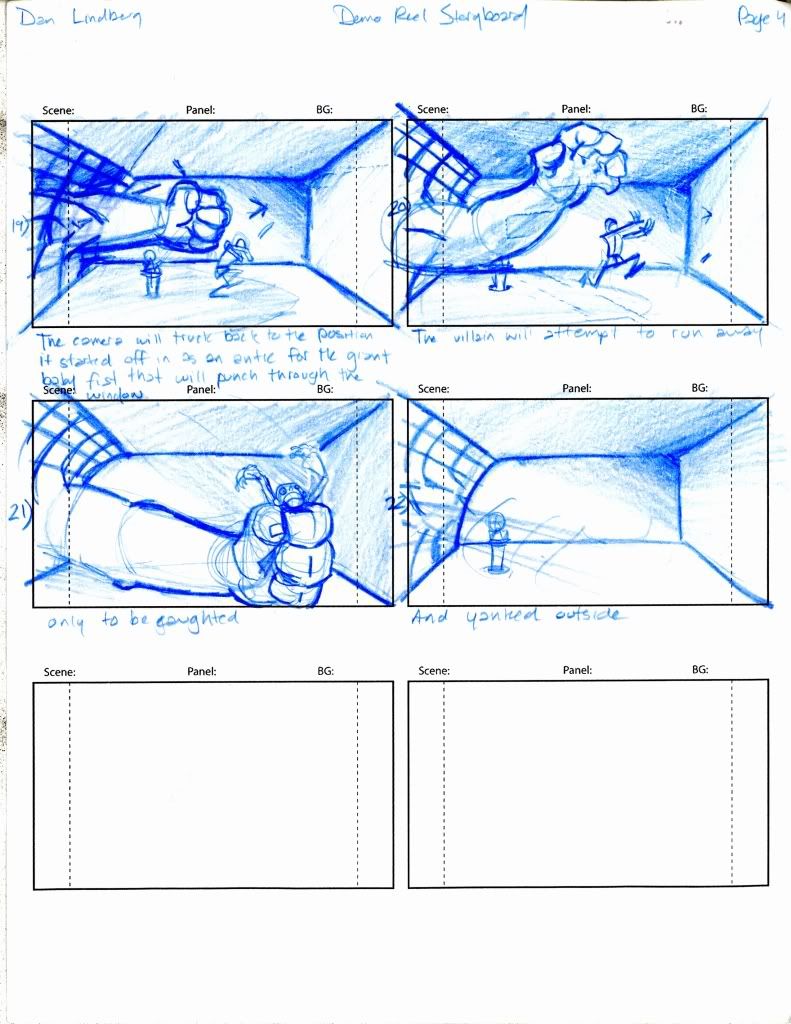
I definitely need to re-record the dialogue to improve its sound quality and get rid of the background sounds from the show. I also need to combine a baby crying with a T-Rex roar for when Super Atomic baby Abe punches through and ganks the mad scientist type guy.
I definitely need to re-record the dialogue to improve its sound quality and get rid of the background sounds from the show. I also need to combine a baby crying with a T-Rex roar for when Super Atomic baby Abe punches through and ganks the mad scientist type guy.
Thursday, March 19, 2009
Demo Reel Storyboard
Here's the story board for my (apparently bizarre) demo reel film idea.
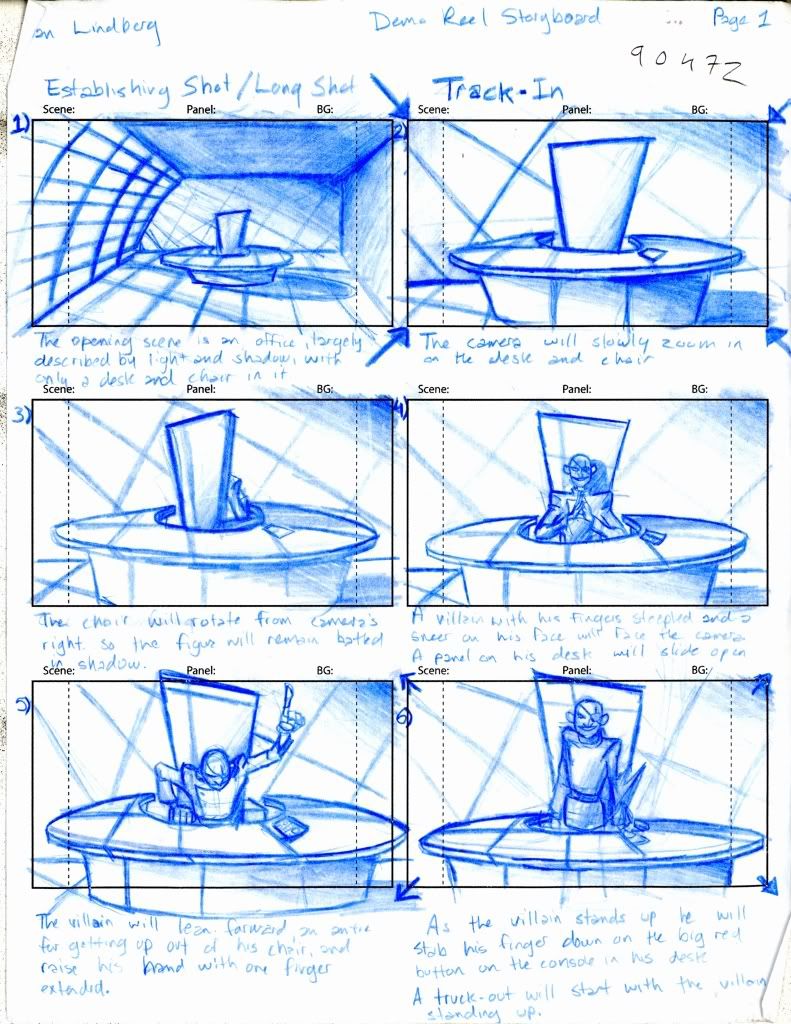
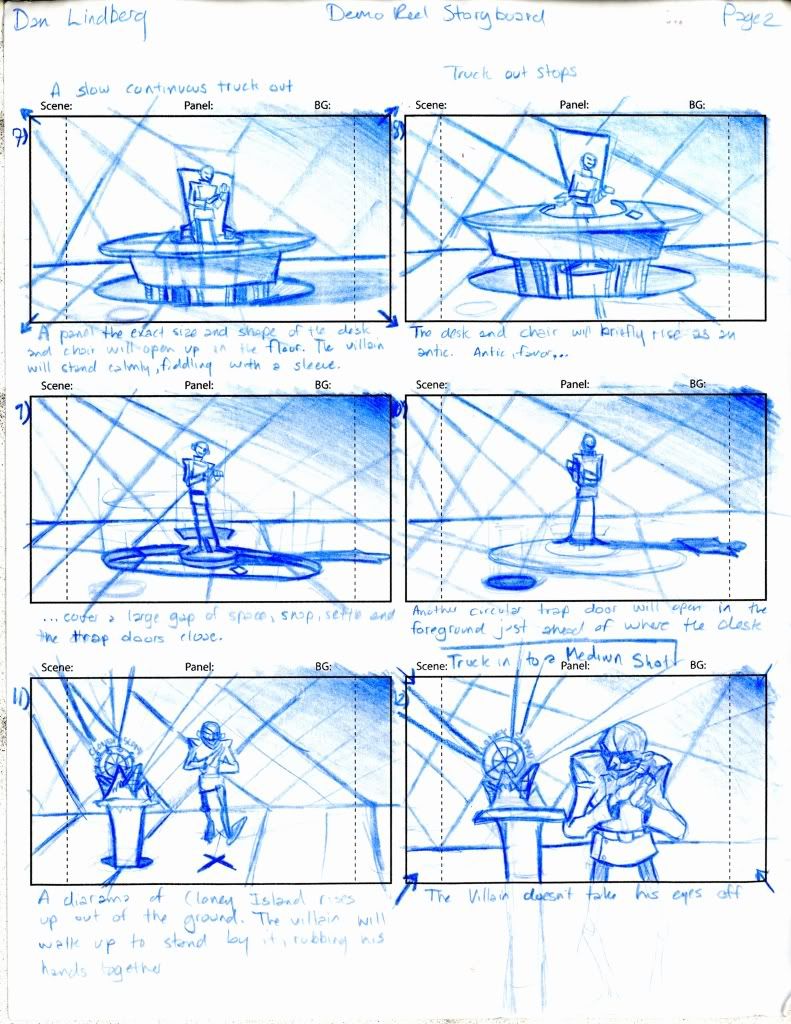
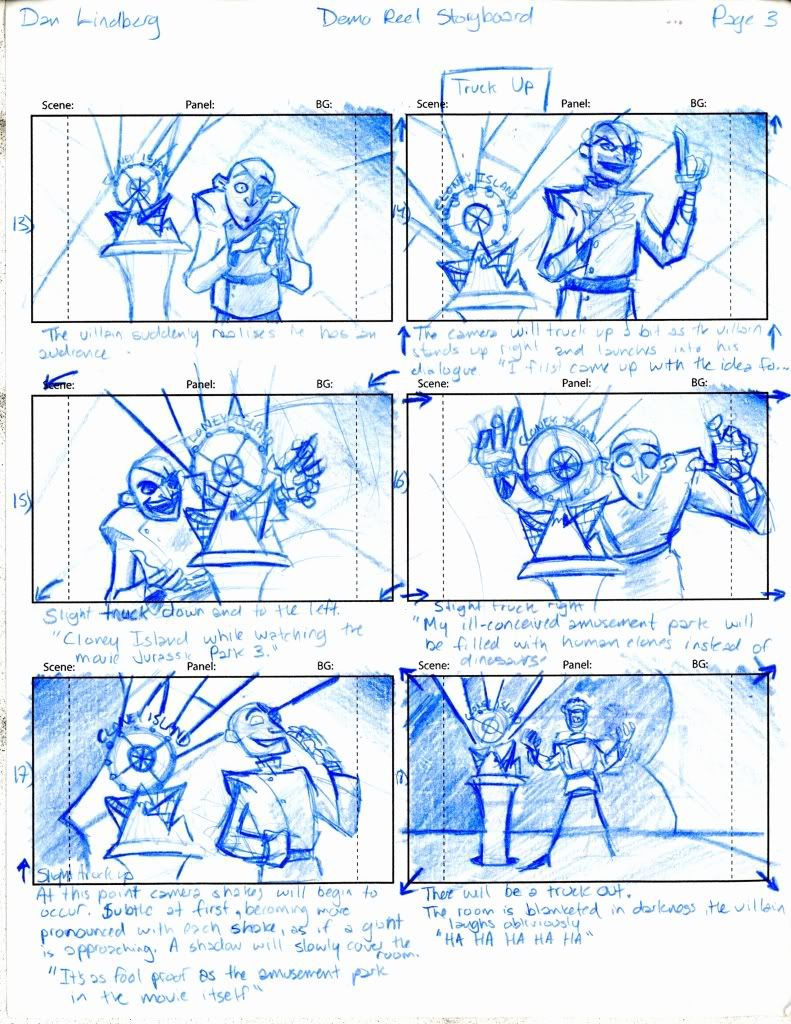
I'm using a line of dialogue from the twelfth episode of Clone High, which at this point I think I'm going to re-record for the sake of changing a word and increasing the sound quality. The clip I currently have is mono and ganked off of Youtube. It's a line of dialogue by Principal Scudsworth.
"I first came up with the idea for Cloney Island after watching the movie Jurassic Park 3. But my ill-conceived amusement park will be filled with human clones instead of zoo animals. It's as fool proof as the amusement park in the movie itself."
I want to change the words zoo animals to dinosaurs and I'm tempted to shoe horn in the words super atomic before human clones, although that might be a bit much. I already have an animatic done and just need to convert it to an avi or quicktime from a swf so I can host it on youtube.
Subscribe to:
Posts (Atom)
